

Kategorien Infos / FAQ Handling on the Genos / SX900
Handling on the Genos / SX900
The more convenient way to prepare a stick for our styles with registrations:
You can download two test styles free of charge, which are prepared to such an extent that you only have to load a complete folder onto a stick according to the instructions provided. Other styles from us can then simply be sorted accordingly.
In general, we recommend setting up our software on a USB stick and running it from there because it offers a number of advantages. Just creating a backup copy of the entire USB stick is very quick and easy.
TIPP We have created a short video on the Genos with the following subtitles:
- Extract the ZIP files
- Possible contents of a title folder
- Folder structure on the USB stick
- Assign style data to the USB stick
- Correct calling up of a title
To the VIDEO
TOP TIPP : We have two free trial styles already sorted into the required USB stick file structure. Simply unzip the file and see where the styles, songs and lyrics are sorted. You can then simply sort other titles from us accordingly. Here the download link
Operation from the internal user drive
3. Folder structure for internal drive C: /
5. Select a song on the instrument
Operation from USB drive. Can also be used for SX900.
6. Folder structure for operating a USB stick
GENOS-Styles
Since we also offer the matching REGs for the styles, the link from the REG to the style must also work on your Instrument. This is only possible if we determine a precise location and save all links from the REGs to the styles accordingly.
Please note the following information so that the links to the style, text and song data also work for you.
A. First, a quick guide:
- Create a backup copy of the ZIP file
- unzip (unzip) file
- Bring Genos into storage mode - Once on the user drive C: / in the folders
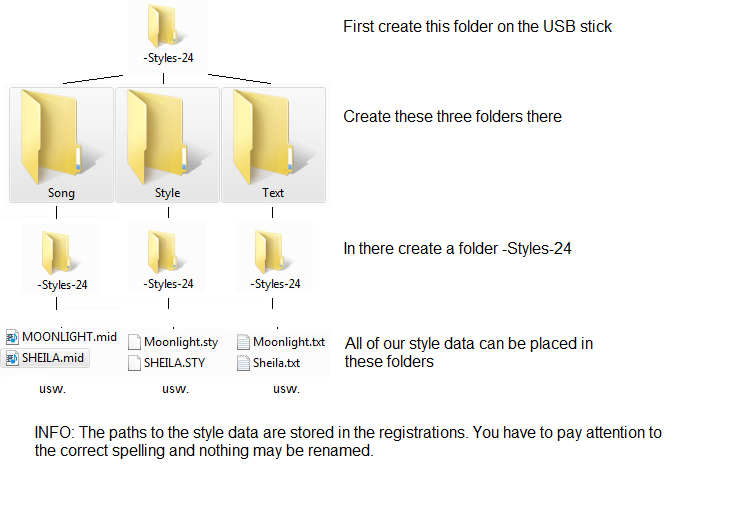
"STYLE", "TEXT" and "SONG" each create a subfolder -Styles-24
- Copy all our styles and songs into the respective styles-24 folders
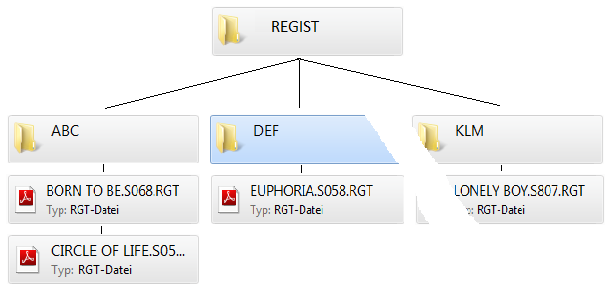
- Sort the REGs into their own REG structure in the REGIST folder
All data of a style set are packed in a ZIP file for easy downloading, which can also be downloaded from the online shop after the payment process.
First make a backup copy of the downloaded ZIP file in a safe place. The zip file must then first be unzipped. To do this, click once on the ZIP with the right mouse button and select "Extract all" to unzip the ZIP. If you have not installed a program for extracting zip files, we recommend the free program "7-Zip", which you can download - here. Before starting a download, always briefly check what has been selected for the download.
Always read through all the steps during installation to avoid installing unnecessary stuff. (This is part of the everyday computer multiplication table) Once the ZIP file has been unzipped, you will see the following folder (example).
The files Style (.sty), Song (.MID and Text (txt) can be used for the operation of the USB stick and for the operation of the user drive C.
The registrations are located in the folders for "Operating from USB stick" and "Operating from user drive C". Please ensure that the correct registration bank is selected for each operating mode.
Storage mode is a simple way of loading data into the Genos. A "printer cable" is required for this.
You can get into storage mode as follows:
- - Connect Genos to the PC with the printer cable when it is switched off
- - Hold down the "Playlist" button and switch on Genos
- - Drive C: / of the Genos is now displayed on the PC
The following already created folders are displayed there.
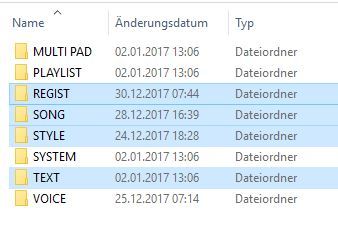
3. Create the folder structure for the internal user drive C: /

The registrations (REGs) work from anywhere and therefore do not have to be downloaded to a specific location. The REGs can, for example, be placed in the "REGIST" folder. If you have already created a folder structure for your REGs in the REGIST folder, you can also sort ours there. Then the title regs can be searched in one central location.
Example:
- Select the register field at the top left in the Genos home display.
- Either search for the title manually in your structure or the quick one
Use the search function.
- Select the title and press Exit.
- Press the REG button 1, whereby style, song, text, all sounds, effects and others
Settings are loaded.
- Play
6. Information on using a USB stick
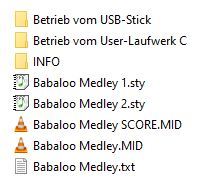
In the folder "Betrieb vom USB-Stick" („Operation from a USB stick“) you will only find the REGISTRATION [RGT] for operation from the stick.
And we still include a folder structure in case you still have to prepare a stick for the Genos. To do this, simply copy the –Styles-24 folder from the “USB stick operation” folder directly onto a USB stick.
On the stick you should now e.g. the following folders and files.
- IMPORTANT: There may only be one stick on the GENOS, otherwise the wrong drive ID may be assigned and the registrations will not work.
In the INFO folder, which was in the ZIP, you will find e.g. also a .doc file with text, chords and playing information.
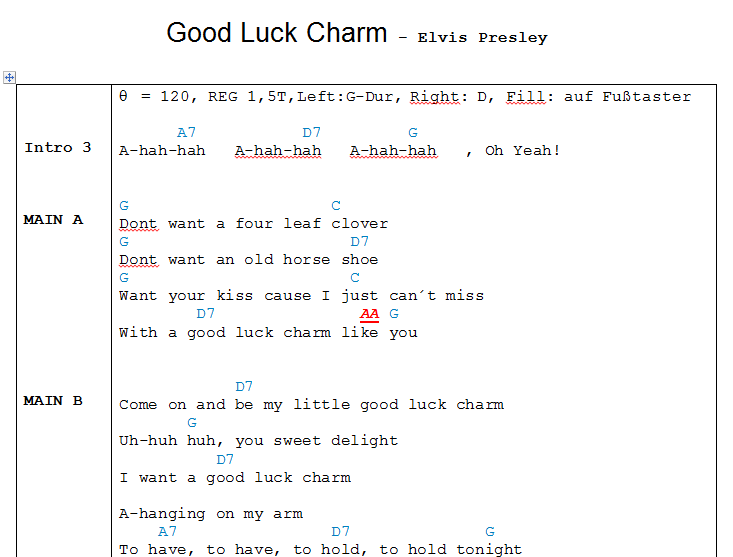
Chords:
As long as you know the melody of the song, it is quite possible to perform the song with just these chords. The information you can find here can of course also be transferred to your grades.
The following information is contained in our chords:
1 - INTRO 3:
The song starts here with intro 3. Per Sync.- Start is a good idea. If REG 1 is not used more than once, INTRO 3 can be called up with REG 1.
2 - 8 T:
Title-related styles can have a finished, even longer intro. So that you don't miss your start, the total playing time of the intro is displayed or the intro is shown with clock fields.
3 - Left - F (Dm F Dm F Dm F Dm):
The intro starts here with an F major chord. You do not finger any chords in brackets.
At the customer's request, we can arrange longer intros, where this makes sense so that the chords in the intro can be fingered. This is much more complex for us, but for an observer it simply looks better when the player is already active in the intro.
4 - Right - A:
In this example, the melody (right hand) begins with note A.
5 - Reg 2:
For this section (Part), a registration proposal was placed on registration button 2.
6 - Main B:
Main - Variation 2 (Var 2) should be used for this part.
7 - End 3:
At this point, Ending 3 should be pressed. Again, note whether chord details are in brackets or whether they should be fingered.
8 - + Left:
At this point, the sound for the left keyboard area can be switched on.
9 - Break:
At this point, press the break button.
10- AA, BB, CC, DD: These are the fill-in names. If you are currently playing with the Main A Variation, the Fill-In AA can be operated here, etc.
Normally, a fill-in should always be pressed almost exactly before the first beat of the measure, at least if the fill-in is to run with the complete accompaniment.
11- OTS1-4: The OTS sound 1-4 can be used.
And now have fun with the Genos.